Spring Boot and JSP Tutorial
2018.05.03 15:54
Spring Boot and JSP Tutorial
-
1- Objective of Post
-
Spring is a famous framework because it supports a lot of technologies for View layer. The technologies supported for the View layer by the Spring are JSP, Thymeleaf, Freemarker, ...
Because of the simplicity of Thymeleaf, it is considered as the default technology used for the View layer, and is automatically configured by the Spring Boot . Therefore, if you choose the JSP for the View layer, you need to configure it. -
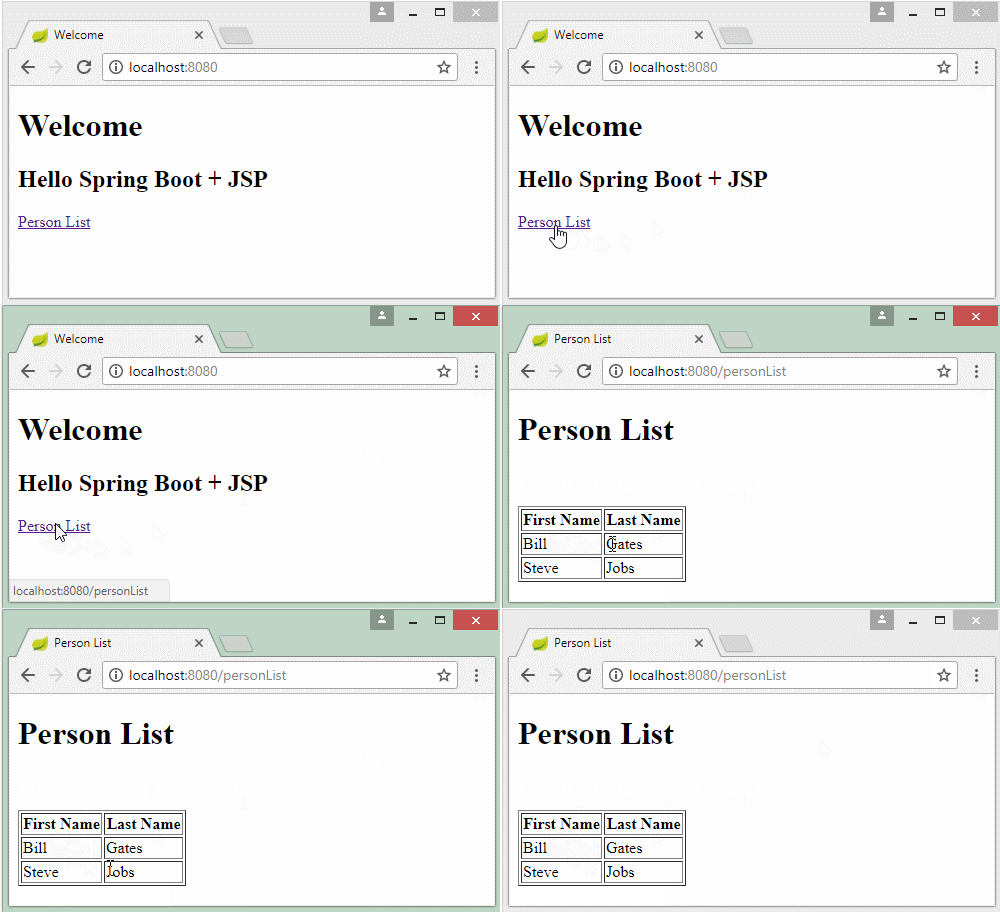
In this post, I will show you how to create a Web application with the Spring Boot and use the JSP to display data. The contents will be mentioned in this post:
-
- Configure to use the JSP for the View Layer
- Explain the operating principle of Controller & JSP.
-
-
2- Create a Spring Boot project
-
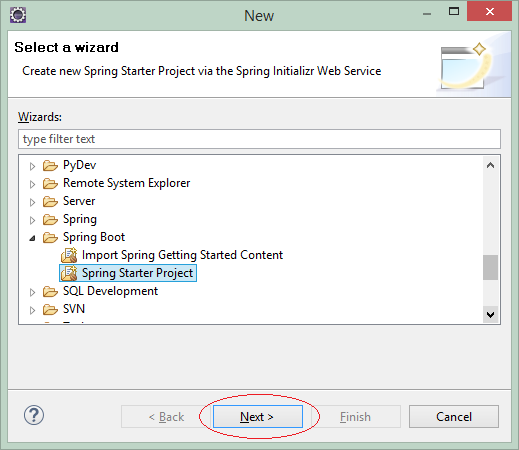
On the Eclipse, create a Spring Boot project.
-
-
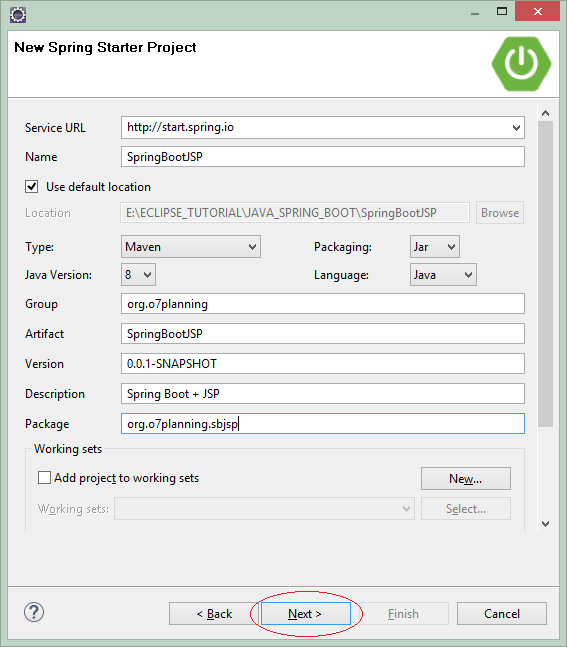
Enter:
-
- Name: SpringBootJSP
- Group: org.o7planning.org
- Description: Spring Boot + JSP
- Package: org.o7planning.sbjsp
-
-
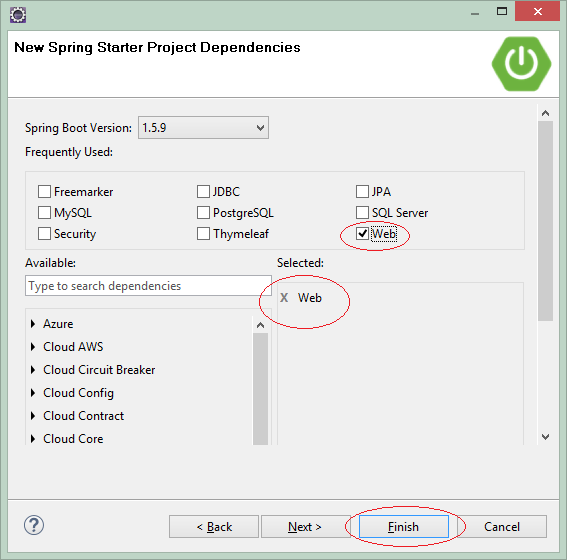
Select the technologies and libraries to be used:
-
- Web
- Web
-
-
OK, the Project has been created.
-
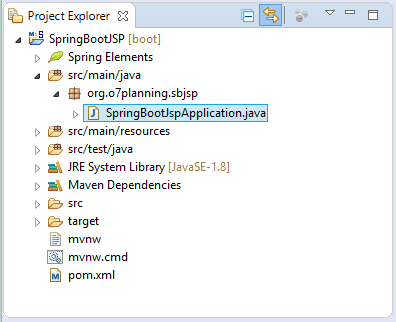
-
SpringBootJspApplication.java12345678910111213
packageorg.o7planning.sbjsp;importorg.springframework.boot.SpringApplication;importorg.springframework.boot.autoconfigure.SpringBootApplication;@SpringBootApplicationpublicclassSpringBootJspApplication {publicstaticvoidmain(String[] args) {SpringApplication.run(SpringBootJspApplication.class, args);}} -
3- Configure pom.xml
-
Configure the libraries necessary for JSP/Servlet in the pom.xml file:
-
123456789
<dependency><groupId>org.apache.tomcat.embed</groupId><artifactId>tomcat-embed-jasper</artifactId></dependency><dependency><groupId>javax.servlet</groupId><artifactId>jstl</artifactId></dependency> -
The full contents of pom.xml file:
-
pom.xml1234567891011121314151617181920212223242526272829303132333435363738394041424344454647484950515253545556575859606162
<?xmlversion="1.0"encoding="UTF-8"?>xsi:schemaLocation="http://maven.apache.org/POM/4.0.0<modelVersion>4.0.0</modelVersion><groupId>org.o7planning</groupId><artifactId>SpringBootJSP</artifactId><version>0.0.1-SNAPSHOT</version><packaging>jar</packaging><name>SpringBootJSP</name><description>Spring Boot + JSP</description><parent><groupId>org.springframework.boot</groupId><artifactId>spring-boot-starter-parent</artifactId><version>2.0.0.RELEASE</version><relativePath/><!-- lookup parent from repository --></parent><properties><project.build.sourceEncoding>UTF-8</project.build.sourceEncoding><project.reporting.outputEncoding>UTF-8</project.reporting.outputEncoding><java.version>1.8</java.version></properties><dependencies><dependency><groupId>org.springframework.boot</groupId><artifactId>spring-boot-starter-web</artifactId></dependency><dependency><groupId>org.apache.tomcat.embed</groupId><artifactId>tomcat-embed-jasper</artifactId></dependency><dependency><groupId>javax.servlet</groupId><artifactId>jstl</artifactId></dependency><dependency><groupId>org.springframework.boot</groupId><artifactId>spring-boot-starter-test</artifactId><scope>test</scope></dependency></dependencies><build><plugins><plugin><groupId>org.springframework.boot</groupId><artifactId>spring-boot-maven-plugin</artifactId></plugin></plugins></build></project> -
4- Configure JSP View
-
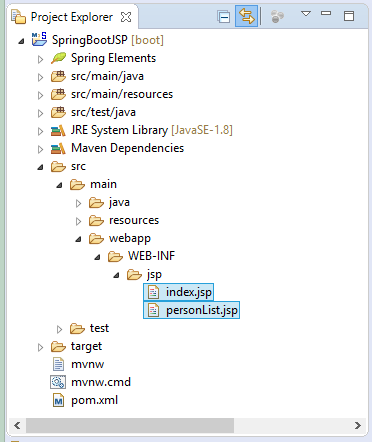
In the src/main directory, create a webapp/WEB-INF/jsp subdirectory, your JSP files will be placed into this directory.
-
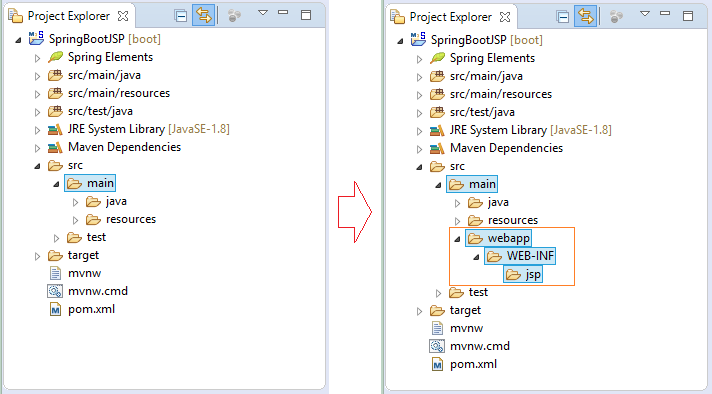
-
In the next step, you need to configure to tell the Spring Boot the place where you will put JSP files. OK, Open the application.properties file and add the following properties :
-
application.properties1234567
# =============================================# VIEW RESOLVER# =============================================spring.mvc.view.prefix=/WEB-INF/jsp/spring.mvc.view.suffix=.jsp -
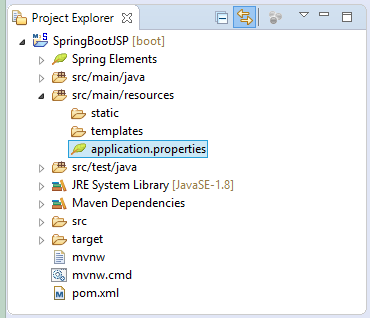
-
5- Controller & JSP
-
The relationship between the Controller and the View is explained in the figure:
-
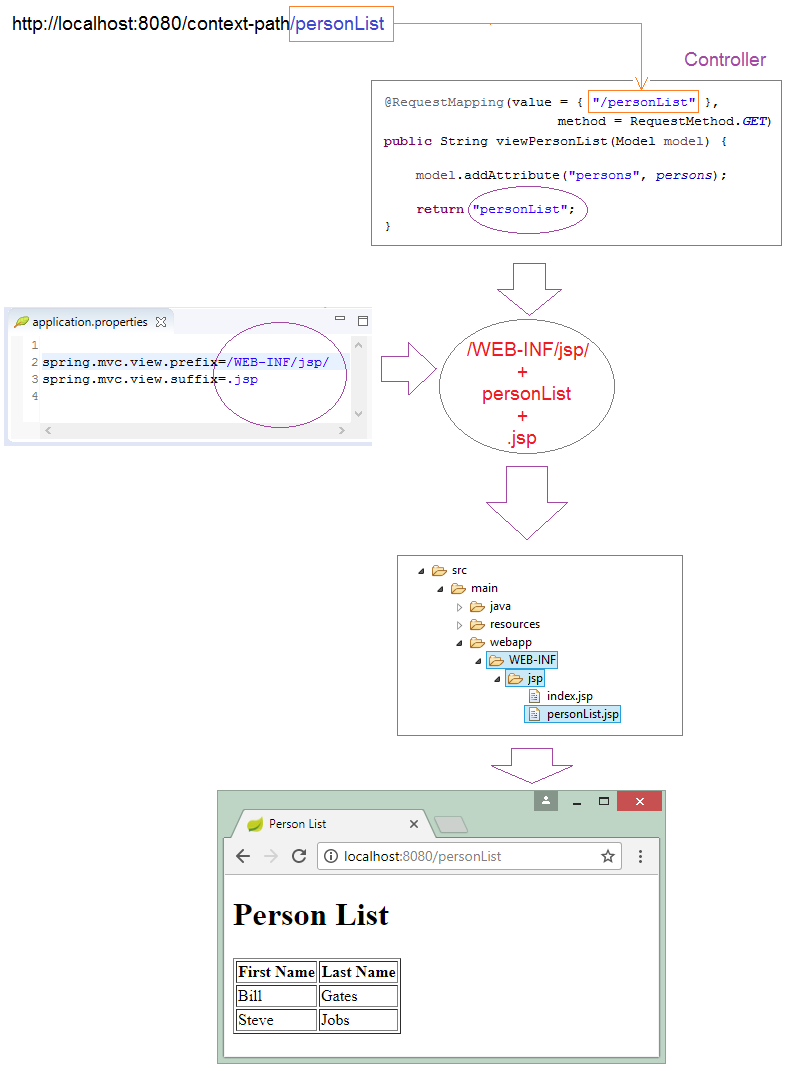
-
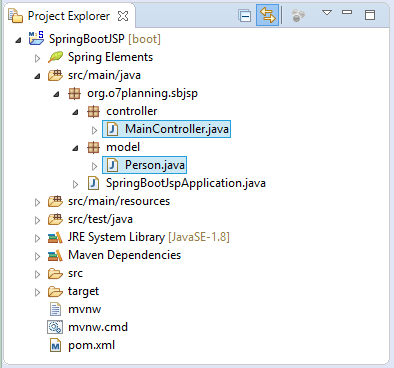
-
Person.java123456789101112131415161718192021222324252627282930313233
packageorg.o7planning.sbjsp.model;publicclassPerson {privateString firstName;privateString lastName;publicPerson() {}publicPerson(String firstName, String lastName) {this.firstName = firstName;this.lastName = lastName;}publicString getFirstName() {returnfirstName;}publicvoidsetFirstName(String firstName) {this.firstName = firstName;}publicString getLastName() {returnlastName;}publicvoidsetLastName(String lastName) {this.lastName = lastName;}} -
MainController.java12345678910111213141516171819202122232425262728293031323334353637383940
packageorg.o7planning.sbjsp.controller;importjava.util.ArrayList;importjava.util.List;importorg.o7planning.sbjsp.model.Person;importorg.springframework.stereotype.Controller;importorg.springframework.ui.Model;importorg.springframework.web.bind.annotation.RequestMapping;importorg.springframework.web.bind.annotation.RequestMethod;@ControllerpublicclassMainController {privatestaticList<Person> persons =newArrayList<Person>();static{persons.add(newPerson("Bill","Gates"));persons.add(newPerson("Steve","Jobs"));}@RequestMapping(value = {"/","/index"}, method = RequestMethod.GET)publicString index(Model model) {String message ="Hello Spring Boot + JSP";model.addAttribute("message", message);return"index";}@RequestMapping(value = {"/personList"}, method = RequestMethod.GET)publicString viewPersonList(Model model) {model.addAttribute("persons", persons);return"personList";}} -
-
index.jsp12345678910111213141516171819
<!DOCTYPE HTML><html><head><metacharset="UTF-8"/><title>Welcome</title><linkrel="stylesheet"type="text/css"href="${pageContext.request.contextPath}/css/style.css"/></head><body><h1>Welcome</h1><h2>${message}</h2><ahref="${pageContext.request.contextPath}/personList">Person List</a></body></html> -
personList.jsp123456789101112131415161718192021222324252627282930
<%@ taglib uri="http://java.sun.com/jsp/jstl/core" prefix="c"%><!DOCTYPE HTML><html><head><metacharset="UTF-8"/><title>Person List</title><linkrel="stylesheet"type="text/css"href="${pageContext.request.contextPath}/css/style.css"/></head><body><h1>Person List</h1><br/><br/><div><tableborder="1"><tr><th>First Name</th><th>Last Name</th></tr><c:forEachitems="${persons}"var="person"><tr><td>${person.firstName}</td><td>${person.lastName}</td></tr></c:forEach></table></div></body></html> -
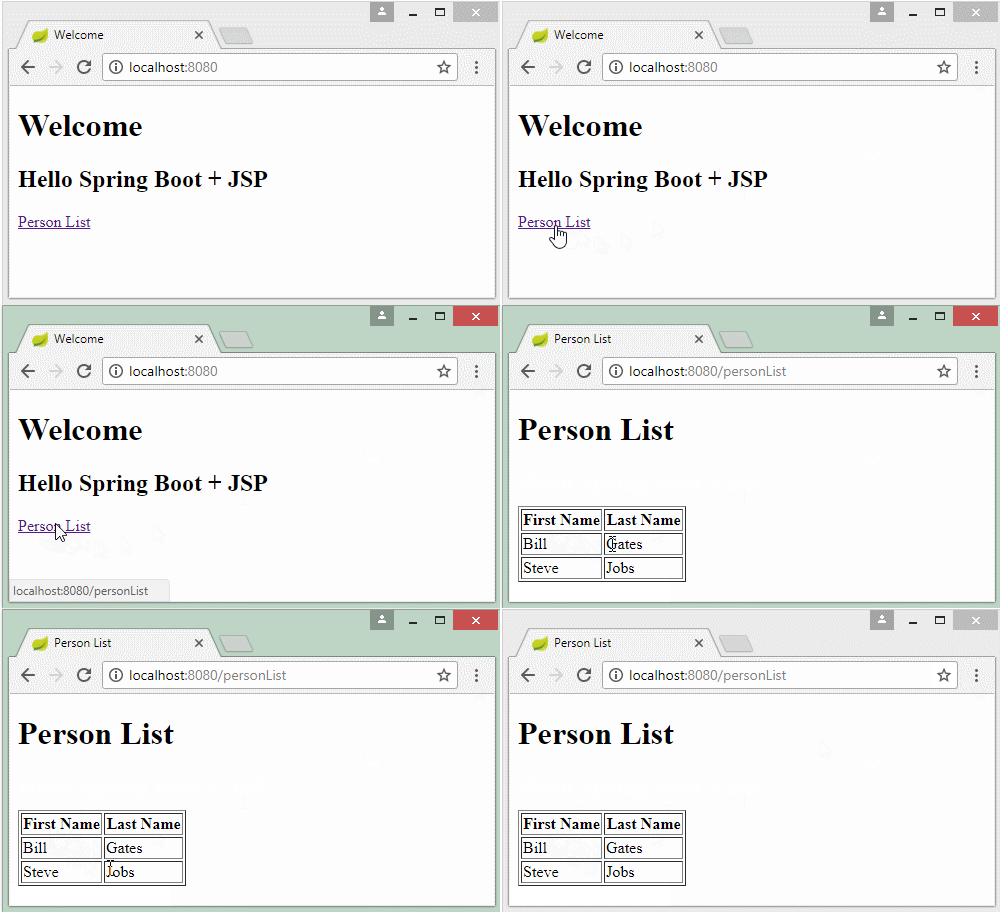
6- Run the application
-
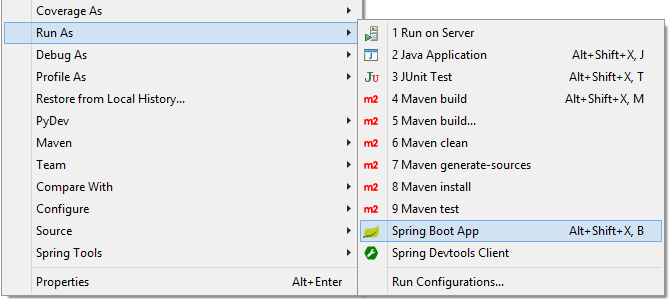
On the Eclipse, right click on the project, select:
-
- Run As/Spring Boot App
-
-
본 웹사이트는 광고를 포함하고 있습니다.
광고 클릭에서 발생하는 수익금은 모두 웹사이트 서버의 유지 및 관리, 그리고 기술 콘텐츠 향상을 위해 쓰여집니다.
광고 클릭에서 발생하는 수익금은 모두 웹사이트 서버의 유지 및 관리, 그리고 기술 콘텐츠 향상을 위해 쓰여집니다.


